Over the past year or so, we’ve been looking into what it would look like to hire a part time artist for Violet. Back in 2019, Hannah, our original graphic artist decided to pursue other full time opportunities. We took that time as a means to evaluate the progress of the game and to seek advice on next steps. Over the following months, we decided to polish the game with functionality that was cohesive from a gameplay and story perspective. In mid 2020, we were ready for an artist, but decided to wait because of the pandemic and the economic uncertainties. In October of 2020, I paid off my house, giving me a lot more flexibility with my budget. After some searching, we found an artist by the name of Tony Wojnar.
Tony is a freelance pixel artist based in Illinois with a lot of skill and a passion for games. He has an eye for design and his attention to detail shows immensely in his pixel art. Though we haven’t worked together long on the project, I can tell he is going to be great to work with. Tony is going to give life and color to Violet, and I am beyond excited for what his capabilities will do for the project.
Other Notable Features and Fixes in the Past Two Months
We can easily summarize the last couple months with one word: polish. There have been so many bug fixes and optimizations that it would be impossible to list them all. A big contributing factor to why so many things have been cleaned up was we created an input recorder. This lets us “playback” the game with the exact inputs on the exact frames, making debugging to the frame possible. We’re able to step through code and memory in ways we’d never been able to before because trying to play the game that precisely is almost impossible to replicate perfectly.
One big feature we added was the ability to heal during gameplay, instead of going to the pause menu. We are able to equip an edible material to the d-pad and quickly heal our character this way. This way of healing is more fun and strategic since there is not a reason to menu in the heat of the battle.
Finally, the biggest update / refactoring goes to the Layer Depth system. Several months ago, we built a system for crossing over bridges and swimming under bridges, depending on where the player approached the bridge. This was working well for the hero, but enemies, weapons, collisions had no concept of this. We had a lot of updating of the Solider AI system to account for bridges, as well as adding collision support for being in certain layer depths. Though this isn’t all the way complete, but we have overhauled the system enough that we have a good starting point. Therefore, once we start building out areas, we should be able to update code in places that need a little tweaking.
In the last post, one of the major clean up items we briefly mentioned was that we updated and fixed throwing of objects. In this post, we’re going into detail on how that was accomplished. Heads up — this is more of a technical post, but we will try to simplify the technical parts.
In Violet, we had an issue where if we were standing next to a wall and throwing an object, the object would “get stuck” in the wall. This is demonstrated by this amazing illustration below.
Problem
The solution to the problem was not very hard to solve for. However, we originally overengineered a solution by examining what direction a thrown object was going to determine if it should collide with a wall or not. Each time we fixed the current issue, we’d find another scenario where the solution failed. This prompted me to do a quick search on the internet, which yielded little results. I’d been playing through The Legend of Zelda: Oracle of Seasons recently, so I decided to throw hundreds of bushes to figure out if a simpler solution could be accomplished. Eventually a light bulb went off and I realized how simple of a solution this really was. So, how do we throw objects in 2D top down videogames, much like the Zelda games of yesteryear?
How the 2D Zelda Games Probably Handled Throwing Objects
Since we’ve been developing Violet in Game Maker Studio 2, the code and examples will come from this engine. However, the concepts should be transferable to the engine of your choice.
We have two variables we keep track of for picking / lifting / holding / throwing. We are calling these variables holdingState and holding. holdingState can have these values:
false – we aren’t doing anything with holding objects
"picking" – we are currently in the picking up animation of an object
"holding" – we are currently holding the object over our head
"throwing" – we are currently in the throwing animation of an object
holding represents a pointer to the object we are holding. For example, if we are interacting with a rock, holding would contain a reference to be equal to that said rock (hero.holding.reference gets us said rock). We’ll talk about holding soon.
With these core variables in mind, we need the hero to start interacting and picking up the said objects. This could look like a million different things, but our check is simply check a spot in front of the hero they are facing and see if the spot contains an pickable object. If it does, and the player is pressing input for picking up objects, then we begin our pickup script. We’ll talk about what picking up a pickable object looks like soon. But let’s start to define what a holding object looks like.
The holding object is an invisible object that acts as a placeholder for the actual object being thrown. This is the solution to the aforementioned problem in the original illustration. See, by having an object act in the place of the object being thrown, we can fake a lot. The holding object is always located at the hero’s x and y location, and we render the holding object above the hero’s head (or wherever).
Solution
We therefore have an illusion that the object is above the hero’s head, but in reality, it is located in the hero. When we throw the object, it simply acts like a normal projectile being shot from the hero, and therefore, won’t immediately collide with the wall when thrown.
Holding Example
The holding object has a number of properties, and we’ll highlight a few now:
reference – a pointer to the object being thrown
holder – a pointer to who is holding the object. If we set it to noone (null in other languages), that means the object is being thrown.
renderX and renderY – the location of where it is being drawn — the illusion
old_reference_mask_index – we use the hero’s mask for the holdable‘s collision so we ensure there is no way the object being thrown will hit the wall. This keeps track of the original mask_index of the object to be thrown.
Now that we understand the basics of the holding object, let’s get back to picking up a pickable object:
/// @description pickup_pickable(conditionIn, inst) picks up a pickable item
/// @param conditionIn
/// @param inst
//assumes holding variable

var conditionIn = argument0;
var inst = argument1;

var success = false;

if (conditionIn)
{
  holdingState = "picking";
  holding = instance_create(inst.x, inst.y, obj_Holdable);

  //update some pointers
  holding.reference = inst;
  holding.holder = self;

  //we use the character mask here because the x and y location of holding is exactly the character
  //since we don't want the rock to collide with the wall when thrown, we want to make sure it uses the same mask
  holding.mask_index = spr_link_mask;

  //copy old mask index
  holding.old_reference_mask_index = inst.mask_index;

  //make the reference not have collisions
  inst.mask_index = spr_mask_none;

  //make the reference invisible
  inst.visible = false;

  success = true;
}

return success;
The biggest things to take away from this script are:
We update holdingState to "picking" and create the holding pointer
We set the holding‘s reference pointer to the pickable object, and the holder object to the hero (self, or this in other languages)
We set the holding‘s mask_index to the hero so we ensure no collisions with the wall when thrown
We keep a copy of the pickable‘s original mask, and give it no mask so while it is moving around inside the hero, it won’t receive collisions
We hide the original pickable object, so we don’t see it inside the hero
Picking Up Example
Holdable
We can now talk in detail about the holding object. If the hero is currently holding the holdable object, we want to set the render variables to a location where the hero is holding the object. If we are currently in a picking up animation, we do some math to tween the object from its starting place on the ground into the final position above the hero. We will always set its actual location (x and y values) to the hero’s (holder‘s) location. Again, the rock is invisible, so we won’t actually see it in the hero.
We finally need to throw the object. Throwing is actually pretty simple, other than the “maths” to calculate where it should go. This again can be whatever feels right for your game, but we’re simply using some quadratic functions to tween the positions from the start of the throw to the where it should land.
When the player inputs the throw button, we should invoke the throw event of the holdable object, and set the hero’s holdingState to "throwing" and set the holding pointer to noone.
The throw event for the holdable object currently looks like this:
speed = 6;
direction = holder.animation_direction;

//the actual object (not the render, moves constantly)
var dist = predict_distance(throwTime, speed, speed, ease_linear);

//set final locations for actual and render
throwYEnd = y + lengthdir_y(dist, direction);

//set the starting location for the throw
throwYStart = renderY;

holder = noone; //the holder is deference since we are no longer holding
High level, this script sets the speed and the direction of the holdable object to be thrown (animation_direction is what direction the hero is facing, limited to 0, 90, 180, 270). Since we’re dealing with illusion values, we need to calculate where the ending location will be. We take the real location values and simply calculate linearly where the object will be in so many frames of game play (throwTime).
Then, in our step event, our renderX value will always be the real x position of the holdable object, but we can interpolate the y value to give it the illusion that it is being thrown. Here’s an example of that:
We should also point out that since the reference‘s visibility is set to false, we can’t see it. In our drawing event of the holdable object, we draw two things — the shadow of the reference as well as the reference.
When throwing is complete — whether the timer expired, or the holdable object hits a wall (legitimately), we need to “turn the reference back on”. Each pickable object has a break event that we invoke at that time. Currently with our rock, we simply call a shatter animation, but this could be whatever. We also want to turn visible back on for the reference object as well as reset the original mask from the holdable‘s old_reference_mask_index.
Conclusion
Though this post covered a lot, there were still a lot of of details not covered in this blog post. Therefore, we decided to host a simple example on Github. This example is a very simple, stripped down version of what Violet is currently using. You’re welcome to modify freely and use for your own projects.
About a year ago, we started building out the concept of bartering in Violet. In the first post on the subject, we explained where the idea came from, how it could be an interesting mechanic, and the drawbacks associated with it. In the second post on the subject, we described in a little more detail how the player would be able to choose what to barter and the system that was needing to be updated to make that happen.
When we started working on it again, we wanted to get closer to solving the problem of “making bartering less tedious”. Before the improvements, the NPC randomly chooses from our inventory items to trade. We added a way for rejected items in a trade to not reappear randomly. However, by using random, we would rarely ever get those items right — adding to many rejections until we would give up and choose the items ourselves. This resulted in many, many clicks, adding tedium to the game. Buying goods and services in games with an established currency is as simple as choosing the item / service, and confirming the purchase (and assuming enough funds exist for the player to make the said purchase). This is essentially two clicks. We wanted to get as close to two clicks as possible. How could we get closer to solving for this?
If you haven’t guessed, removing the random element for the NPC to choose items was the first step. In order to get close to “two clicks” we need that initial trade to be what the player would want to trade. If we can get it right on the first try, we get three clicks:
Would you like to barter this burrito? <yes>
Will you give me your two hot dogs? <yes>
Thanks! <close>
Bartering Example
So how do we make the game know that two hot dogs is what we want to trade? Well, we’re glad you asked!
Coming Up With THE List
Every barterable item in the game has a weight associated with it. We can think of this weight as “preference” — the bigger the weight, the more preferred the item is for the player. The least preferred items are sorted at the top of the list while the most preferred items are at the bottom of the list. When the NPC starts determining whether they like the item or not, we start at the top of the list with the player’s least preferred items. If the NPC likes an item, we add it to the list. If they don’t like the item, or the combination of items, it doesn’t get pulled into the list. Since we start at the least preferred items, we’re almost guaranteed that the player will be happy to trade the items.
Bartering Trade
Defining these weights gets a little bit trickier. As the games continues to be built, we will add / update these values. But here’s what we’ve come up with so far:
When the game boots up, all items start at a weight of 0.
When a player uses an item, the weight is globally incremented by a small value (weapons = 1, bows = 5, rods = 10, materials = dependent, but a smallish number).
Therefore, the more an item is used, the more preferred it is.
When bartering, if the player rejects a list, (and eventually the player DOES accept a trade), each item’s weight in the rejected list gets incremented by 100 globally.
This is because we assume the player rejected the item because they prefer it.
When bartering a weapon, if there is a difference in rank, we locally increment the weight by rankDifference * 250.
If we want a C ranked weapon and the NPC sees a D ranked weapon, the weight locally decrements by 250, making it less preferable.
When bartering, if the player rejects a list, for the session (locally), each item’s weight in the rejected list gets decremented by 500.
This is because when the NPC “searches again”, we don’t want the similar items to appear again.
Bartering Dialog
Though the above isn’t perfect, it gets us much closer to a bartering system that is less tedious and closer to the “two click” dream.
Other Notable Features and Fixes in the Past Two Months
Like usual, I began to think there wasn’t as much accomplished in the game. But as soon as we look at the commit history, we realize we’ve been busy with many awesome things. Take a look:
Any object we want to have collisions with weapons can now do so:
For example, we can cut down a tree or break rocks with our weapons
Using an axe with a tree won’t level down the axe, or using a pick axe with a rock won’t level down the pick axe
However, other items with these said objects will level down them down
We added a (rough) tree falling animation, as well as stumps for each tree
Cutting Down Tree
Any object we want to take damage from temperature extremes can do so now:
We really wanted the special weapon “bomb” to explode when near fire, or in extremely hot places
Fire Transfer on Weapons is much more refined:
We currently had it working with arrows, but now we can fairly easily add to whatever
We added to the stick weapons, which can now act as a torch for the player
Stick on Fire
We added more placeholder sound effects:
As we started adding more collisions, it was getting jarring that the same effects would play
We also added looping sound effects, rain and fire, which ease in and out as there is more of it
We added slope tiles:
If we are moving up and the slope tile is down, our speed will decrease
If we are moving down and the slope tile is down, our speed will increase
These are currently near cliffs, but we can be added anywhere
Updated the collision of walls routine:
We noticed an anomaly with dodging in that huge amounts of speed were gained, even when colliding with a wall. This has been patched so there is no clipping through walls this way (sorry speedrunners 😉 )
We also added a get unstuck routine, which basically finds the center of the hitbox of an object, and pushes the object that got stuck away from the center
Updated camera zoom functionality to be more robust
Fixed a memory leak on the pause screen
We also have two other big features that we’re going to make dedicated posts for:
Updated / fixed the throwing of objects
Added a disable rooms script to Game Maker Studio 2
In our last post, we gave an overview of the special weapons in Violet. We were still working out the names of these as well as the functionality. Over the last couple months, we’ve experimented, polished, tested, and then refined each weapon where we feel we are in a good place. These weapons are unique, but still feel balanced with the rest of the game. The weapons also don’t cause major game breaking bugs anymore, and fit with the rest of the item system we’ve previously built. So without further ado, let’s get into it.
GMS Tasks / Draw Container
In a more technical post, we created two open source repositories for others building games with Game Maker Studio to use. One problem we were frequently running into the last couple months is build times. With many experiments and polishing of special weapons, even the slightest change would take 45 seconds to test. This is frustrating if, for example, we wanted to see how changing the a weapon’s speed of 3 to 4 felt. For our current project, rooms take 15 seconds of the build time. And for most cases (especially testing special weapons), we don’t need to compile all the rooms. Thus, we wrote a script to disable / enable rooms in GMS. This has dropped our build times from 45 seconds to 30 seconds. As we add more and more rooms, the time saved is going to be exponential. We added this script in GMS Tasks, which can be learned more about it here.
We also patched a few issues in the Draw Container repository, as well as added a property to flow called stack. We can read more about it here.
Refactoring / Collision System
It was that time again — refactoring. Our TODO list was getting quite large. The majority of the items in the list were revolving around the collision system with items we’ve previously built and the hacky implementation of the new special items. Since the high level ideas of our special weapons were working, it was time to refine the system we had in place. After a couple weekends of white boarding and implementing, the collision system was better than ever!
New Collision System
The system should be robust to handle any situation we dream up of now — assuming it follows the flow above. Each weapon has three distinct special case functions that are allowed to alter the behavior of a collision and the result from it (for example, the direction to move, how fast to move, how long to be stunned, etc.).
There was quite a bit of other refactoring done as well. Much of it was around the special weapons and their intricacies — which is a great segue into the meats and potatoes of this post.
Bomb Gloves
Bomb Gloves are used to create bombs from the earth. Though we haven’t built a concept of from the earth (which means bombs can be created anywhere currently), we have updated how bombs are created and how they work after they are created.
First, bombs use the same structure now when trying to create weapons. This means once we’ve started to create a bomb, we can’t also try to swing a sword.
Second, we decided to refactor weight in our game. Before, light weight things had a weight of 1, the hero and the soldier type enemies had a weight of 3, and heavy things had a weight of 4. This worked fine initially, but proved to be a problem for many reasons, which we won’t get into as that would be “getting into the weeds“.
When picking up objects in the game, the heavier the object, the longer the animation plays out for the hero to pick up the animation. Since we don’t have an actual animation for creating bombs from the earth, we decided to simply use the picking up animation for now, but set the bomb’s weight to 333.33 (for comparison, the hero and most soldier enemies have a weight of 100 (roughly equal to 180 pounds)). The bomb would use this weight to delay the animation for a long period of time to “fake” the idea we are creating bombs from the earth. Once we have created the bomb, we set the weight back down to 50. The speed at which objects being carried, as well as the damage dealt by being hit by a thrown object are based on the object’s weight. Thus, we didn’t want a bomb dealing more damage being thrown than exploding, and we wanted the hero to move when holding the bomb. 😉
Third, which was the biggest change, bombs now can explode in the hero’s hands. This took a lot of restructuring, as before, the game would swap the real object with a holdable object that resembled the real object. The problem in this case with the bomb, is we wanted to have the bomb explode in our hands, but the object we were holding was not the actual bomb. Thus, the animation timers would only run when we threw the bomb. We would also reset the animation of the bomb if it got picked up again.
Bomb Still Ticking
We decided on this change because we want to have puzzles where there was a wall in an area that doesn’t have earth. Thus, the key to the puzzle is creating a bomb in earth in one area and transporting the bomb to the wall needing to be blown up, without the bomb going off. We would never have had the solution of transporting, since the bomb would never go off the way it was built before.
Now holdable objects contain the reference object, which is still active and allowed to perform timers. But the position of the reference object (aka, the real object) is relative to the holdable object, which makes it look like the holder is carrying the reference object.
Boomerang
If you remember from the previous post, the boomerang was a working name. We spent weeks trying to come up with a unique name / weapon that followed the conventions that we previously built. Guess what we settled on? A boomerang!
Updated Boomerang
As we were brainstorming, we stumbled upon this youtube video and this site that gave us the inspiration we were looking for. See, we didn’t want a traditional “C” shaped boomerang, because the boomerang’s flight in Violet’s could be controlled. So as we were brainstorming, we wanted a weapon that made “game sense”. When we discovered that boomerang’s didn’t have to be “C” shaped, a light bulb went off. “What if it was still a boomerang, but the design of the boomerang was unique, which is why the boomerang is able to be thrown so precisely?” And the rest was history. You’ll have to excuse the art for now, as it is something I drew up. But the idea is that it has a double “C” shape, that sort of resembles a Violet leaf.
The boomerang is now considered a weapon, which follows the collision system above, as well as the player not being able to use other weapons when the boomerang is pitched, drawn, thrown and caught. We also added animations for throwing and catching the boomerang.
When drawing the path, we made it harder to draw lines that turn 180 degrees. Essentially, there is always a bit of a curve when changing directions rapidly. Boomerang’s at the end of their path will also not immediately turn back to the hero (unless the path drawn was turning towards the hero), but will arch around like a traditional boomerang would. When collided with the boomerang, enemies will take 20 damage each time they get hit, as well as being stunned for some time. If skilled, the boomerang can become a mighty weapon to keep enemies at bay, as well as a useful stun tool.
We refactored the camera as well for panning purposes. We already had a hacky solution of the camera being able to follow the line, and then pan back to the hero. But now, we’ve added the ability to easily pan to whatever object we want in the game, for however long we want the pan to take.
We believe the polishes we have added will make it a great weapon in combat, as well as serve as a great key in solving puzzles with non straight lined distant switches.
Grappling Hook
The grappling hook was among the first things to get refined after our last post. Like the other two special weapons, the grappling hook follows the collision structure we refactored, as well as being used as weapon which follows the structure for other weapons (i.e. the player not being able to use other weapons during use of the grappling hook).
The main concepts have pretty much stayed the same for the grappling hook, with the exception of adding longer ending lag (cool down) when the grappling hook reaches the hero. We also made it so the grappling hook can’t hook enemies at shorter distances — therefore, making it a little less overpowered to repeatedly and instantly stun the enemy. We also increased the damage output to 30. And finally, we made it so the player can’t hook an enemy holding a shield (but this might change to let certain kind of shields be hookable).
Grappling Hook Cool Down
Otherwise, much of what we discussed earlier with the refactoring also applied to the grappling hook. The biggest being the weight issue. We wanted the hero to move towards heavy, hookable objects. But there was no concept of weight for anything but living objects, and it was poorly implemented. Now, all interactable objects have weight‘s, which let’s us seamlessly execute code for hooking to a interactable and hookable object. For example, a tree is interactable and hookable with a weight of 6000, which is much greater than the hero’s weight of 100, thus, the hero will be projected towards the tree.
The grappling hook is a great offensive weapon with its ability to stun and bring enemies towards the player. Its combo into melee weapons will make it a great utility for players. But the grappling hook’s lag makes it not great against a group of enemies.
Orb Shooter
The Orb Shooter has caused us much pain in the month of September. In fact, we were planning on writing a blog post much sooner in September, but we went back to the drawing board on the Orb Shooter, and we really wanted this post to be titled: Special Weapons Part Two and not Special Weapons Part Two Minus the Orb Shooter. However, we finally feel like we have something that functions the way we imagined, as well as not being too overpowered or underpowered.
If you remember from the previous post, the Orb Shooter is very unique in that it doesn’t deal damage, but creates a force field of orbs that acts as a defensive mechanism for the hero. Before, the orbs orbiting the hero that collided with enemies would also do something. At one point the orbiting orbs would stun. At another point the orbiting orbs would do damage. Another point it did both. At another point, the orbiting orbs would stun if so many hit an enemy in a row. And on and on it went. We finally made orbiting orbs simply do nothing. Astonishing, I know! The thing that we were getting hung up over was that these orbiting orbs needed to do something offensively. However, in the state of orbiting, orbs should just be the force field around the hero that act defensively. We also played around with the orbiting orbs pushing enemies, but that didn’t seem right either. Orbs orbiting the player simply protect the player from damage.
Orbiting Orbs
However, the Orb Shooter does play some offense (well defense). As before, if the Y button is pressed, an orb will be shot towards the target, or in the direction the hero is facing. Each orb acts as 1 stun point towards an enemy. Each enemy, NPC, and the hero have unique stun points (SP). The more SP, the more hits that can be withstood before being stunned. If we shoot 4 orbs at an enemy with 4 SP, they will be stunned. Orbs still don’t deal any damage, but with it’s recharging capabilities, this makes the Orb Shooter a great utility to fire orbs at your enemy as a “stun gun” — stunning your enemy for a short period of time.
Most of the time though, we want to use the Orb Shooter as a protective utility. Holding down the Y button will continue to spawn the orbs to orbit around the hero. When the Y button is released, a blast of orbs will be shot in one of two ways:
If the player is targeting an enemy, the orbs will be shot in the enemy’s general direction.
If the player is not targeting an enemy, the orbs will be shot in a direction away from the player.
Orbs Scattering
In either scenario, the number of orbs shot will be the number of SP they have. So in the above picture, each orb as roughly 26 SP — enough to stun any enemy in the game currently. Orbs will pierce, making orbs hit enemies behind enemies. This makes the Orb Shooter a great utility to stun surrounding enemies all at once. However, tougher enemies will not be stunned for very long. And shields can block orbs.
The Orb Shooter may get more polishing as we see players use the weapon. But for now, the high level attributes are bound to stay. And we’re happy to say, it’s a ton of fun to play with — and will be interesting to see players master the Orb Shooter, as well as all the unique special weapons we’ve created!
It’s been a few months since the last post. After we added bombs into the game, we started designing some dungeons on graph paper. However, we quickly realized that without having special weapons locked down, we really couldn’t design dungeons because we might accidentally make them obsolete. This is because special weapons serve as “keys” to “locked doors” in dungeons. For example, perhaps a weak wall stands in the way of the player. Using a bomb to blow up that said wall is the “key” to “locked” wall.
We had two goals in mind when coming up with these special weapons:
Thus, we began the adventure of brainstorming what special items (as well as other special armor / gear) the hero can collect along the way.
Bomb Gloves
Last time we mentioned we had created WIP Bombs. We’ve polished bombs a little more, and even added gloves to the hero, so the player knows when they’ve equipped the Bomb Gloves. Bombs will obviously break through weak walls, as well as deal heavy damage to enemies.
Bomb Gloves
Light Rod
The Light Rod will be the final rod of suite. Currently Fire, Water and Ice Rods have multiple varieties, as well as derank during use. However, the Light Rod will not derank, and there is only one Light Rod. It took us a while to come up with how light can damage an enemy. Then one day, it hit me as I was driving and I could barely see with the sun in my eyes — what if being blinded was a game mechanic? Thus, the Light Rod casts a beam of light that can stun an enemy instantly if the beam hits the enemy in the face, as well as deal 20 damage. Originally, we were going to blind the enemy either temporarily or permanently. However, this felt too overpowered because the enemy would roam around aimlessly, making them too easy to kill. Therefore, we went with the stunning the enemy for a good amount of time approach.
Light Rod
The Light Rod will also shine light in dark areas, clear dark energy, and turn stone into rubble. Beams can also be reflected off of certain surfaces.
Boomerang (Working Name)
We thought it would be cool if we could have a weapon where we draw its path. After playing around with it a bit, we finally had something that seemed to work well in the engine. Currently we are using a boomerang to represent the object — but this will change as the game and story gets refined.
Boomerang Draw
When the player presses the attack button, time stops and they are able to draw a line that the boomerang will follow. Lines can’t flip, but can be drawn for a certain amount of time. The end point will eventually move faster and faster and fade once time is about to expire for drawing. After the line is drawn, the camera is moved back to the hero and the boomerang is thrown.
Boomerang Throw
If the boomerang hits a wall or reaches the end of its path, it will navigate back to the player. Currently, the boomerang automatically stuns enemies for a small amount of time, as well as deals 10 damage. The boomerang will also hit switches that a straight shot (e.g. a bow and arrow) would not normally hit if a wall is in the way, because the player can draw a path around the obstacle.
Grappling Hook (Working Name)
The Grappling Hook is the hookshot equivalent in Violet. If an enemy is far away, the Grappling Hook can be used to bring enemies closer to the hero. If the enemy is much bigger than the hero (e.g. Centaur), the hero will actually be projected towards the enemy. Enemies caught in the hook will also be dealt 10 damage, as well as stunned for a small amount of time.
Grappling Hook
The Grappling Hook can also be used to reach areas not normally reachable on foot by the hero. The Grappling Hook can be thrown and latched on certain surfaces that the hero can then be projected towards.
Orb Shooter (Working Name)
The Orb Shooter is very unique in that it doesn’t deal damage, but acts as a defensive mechanism for the hero. If the Y button is pressed, an orb will be shot towards the target. However, if the Y button is held down, orbs will begin to surround the player, acting as a defense. If so many orbs hit an enemy, the enemy will be stunned. If an attacking enemy hits the hero when surround by orbs, the hero will take no damage and an orb will dissolve. Orbs that are shot cannot protect the hero. If the player releases a held Y button, all of the orbs that were surrounding the player will be shot towards the target.
Orb Shooter
The orb shooter can also be used to trek harsh surfaces because the orbs act as a barrier for the hero.
Conclusion
It’s taken a while to not only figure out what these special weapons were going to be, but how they function in the game. Much of these are still early in the design phase and will probably get major adjustments to them. We’ll also want to make sure they are balanced well with the rest of the game. Since we have a good system in place, it shouldn’t take two years to get these polished like the rest of the engine. 😉
Part of creating a game requires developing tools and other functions that don’t necessarily effect the player, but help in the process of making the game. These tools can be range from art assets, such as this sprite generator from https://github.com/makrohn/Universal-LPC-spritesheet, or these utility functions from https://github.com/gmlscripts/scripts. Either way, in creating Violet, we have borrowed so much from the help of others, that we decided to contribute some of our own works. After all, we would not be as far as we are today without the help of the community. So, we hope that this post, and these “few lines of code” will help make someone else’s project go from dream to reality.
Draw Container is a layout text engine we developed for Violet with Game Maker Studio 2. Instead of managing ever-changing positions and sizes of the draw_text routines, we manage containers and their layout type. Draw Container uses concepts similar to CSS Layout and Relative Layout.
Perhaps we need to draw some text to the screen. Or perhaps we need to draw an advanced GUI. Draw Container has been a huge help with the development in Violet. We introduced a simple version of it on the Day 32 post. However, that version quickly became obsolete as we need to render sprites and nested text. With Draw Container, we can draw extensive GUI’s, character dialog, HUD elements and much more!
Let’s look at an example:
Draw Container Example
We can see that draw_container renders a root container called data. data has a size of 360x260, with a background color of light gray and is rendered in the middle of the screen. It has a child container called middleChild, with a background color of modern black, a margin of 20px and a padding of 20px. middleChild has three children called cols with a grid layout of column. This means that col's children will render by being “stacked” on each other. The first child of cols is called row1. row1 tells its children to render their sizes equally by using a property called flow and setting it to split. Each child in row1 has a margin of 10px and a padding of 10px. The other two children of cols, row2 and row3 and their cihldren are very similar to row1. and it’s children.
There are plenty of other examples provided in the repo link above, as well as a more in-depth look on all the available properties and how they behave with one another. Hopefully creating text-based UI will become a much more manageable with draw_container in Game Maker Studio 2.
GMS Tasks adds some command line tasks for repetitive actions for Game Maker Studio 2. Current tasks include merging instances in several rooms into one room, stitching a world map from images, exporting all sprites from your project to sprite strips, making Game Maker sprites (yy files) from strip files.
Some of these tasks, such as merging instances from several rooms into one room might be pretty niche to Violet with how we are developing our open world. However, there might be other tasks in here that would be of benefit.
GMS Tasks currently has six tasks available:
Build
The purpose of the build command is to take instances in several rooms and copy / paste them into the “main” room.
Let’s say we are building an open world game in Game Maker Studio 2. We’ve found that after a while, using the room editor with thousands of instances makes the room editor slow and unusable. Our solution was to create “copies” of each room, in their full size, and only work on a section for each room. Then, when it comes time to “test” the game in the “main” room, we can run our script to merge these instances into the one room.
Clean
The purpose of the clean command is “clean” the main room from the build command — essentially reverting the main room to its former state.
Generate Map
The purpose of the generate-map command is generate (stitch) a map image from a open world game in Game Maker Studio 2. In Violet, we are currently export all the things we want on our map to an image file, and then render that image file for the “map”. This script will take images generated from Game Maker Studio 2, and stitch them together into a map.png file.
Export GM Sprites As Strips
The purpose of the export-gm-sprites-as-strips command is to take all sprites in a Game Maker Studio 2 project and export them as strips. This can be very useful if we need to export are sprites as strippng files for an artist.
Make GM Sprites From Strips
The purpose of the make-gm-sprites-from-strips command is to take (very many) strip images and import them into Game Maker very quickly. For example, let’s say we generated many characters from https://github.com/makrohn/Universal-LPC-spritesheet To import each individual row into Game Maker for many strips is very time consuming. This task will speed up that process.
Snap
The purpose of the snap command is take all instances from specified rooms snap them to a grid. Sometimes when copying / pasting large volumes of instances in the room editor, the grouping does not conform to the instance grid it was copied into. This command will run and ensure all instances are placed correctly on a grid.
I didn’t realize how long it had been since the last post. It felt like we hadn’t done too much that was worth sharing. However, after looking back at the commit history, there’s a lot of cool things to talk about. So here we go!
We were planning on adding special weapons to the game, besides the balanced / agile / heavy / rods that we already have. These weapons will be obtainable by progressing through particular dungeons. Without spoiling too much on the “special” mechanics of the bomb, we wanted to at least explain the direction we were thinking of the bomb.
Bomb (Original art by IndigoFenix)
Unlike bombs in Zelda games, bombs in Violet will be on the heavier side. Picking up and throwing bombs will take some time to do. However, if you can land an attack with a bomb, it currently deals 150 damage (7.5 hearts)! That is the equivalent of a S ranked Heavy weapon’s damage output! The blast will disperse those that collide with the bomb at high speeds. The closer you are to the blast zone, the faster you’ll move! The blast of the bomb also stuns, There’s a bit of risk using the bomb, but there’s a good amount of reward, as well as a ton of fun to pull off landing the explosion!
Added Animations
Not to be confused with “good” animations. This simply means we added some animations to things in the game there were originally instantaneous. The aforementioned picking up and throwing now has animation. Objects with little weight will be quick to pickup and throw, while objects with heavier weight will be slower to pickup and throw. We didn’t want to be obnoxious with the speeds, so they’re still pretty generous. It does give a little more risk to picking up and throwing things, however. Once the action has started, it can’t be canceled (unlike other actions in the game).
Pickup Animation
The other animation we added was removing arrows from enemies. Again, this used to be instantaneous, which made shooting arrows in your enemy, then removing them immediately pretty OP. However, with an animation, there’s a little more risk involved in removing arrows from your enemy. We didn’t want there to be no reward (other than getting your arrow back) — so we improved upon the “stuck arrows” mechanic (special thanks to a friend for these ideas).
Remove Arrow Animation
Improved Arrow Mechanics
Along with the animation that we implemented, there are three new risk / reward mechanics to “stuck arrows”:
Originally, each arrow stuck in an enemy would deal 2 damage per second per arrow. There was no cap, which would make fighting Centaurs, for example, really easy to defeat by shooting, say 30 arrows, and then waiting for it to bleed out. Now there’s cap at 5 arrows. The player can still of course “abuse” this mechanic by waiting the enemy out — and that is fine with us! Because…
Each arrow in an enemy will make them attack faster (capped at 5 as well). Arrows in an enemy will result in them getting more aggressive as they bleed out. Too many arrows in your enemy at once will also make it harder to remove them as well, because you’re enemy will be attacking much faster.
The reward though for removing an arrow from an enemy is that it will deal 1.5 times the damage coming out than it did going in. So, if you shot the arrow with a bow that deals 30 damage, it will be removed at a damage of 45. Not too shabby!
We also fixed an issue where fire arrows getting unloaded would leave behind the particle of fire. After thinking about it for a while, the easy fix ended up being if an arrow collides with the unloaded zone, instead of unloading the arrow and trying to properly remove the fire particle, the arrow could “break” and we no longer have to keep track of the arrow or the fire, because a breaking arrow destroys itself and properly “puts out” the fire object.
Improved Shield Mechanics
One thing I’ve been struggling with for a while is “what’s the point of leveling up a shield”? Originally, there was no advantage in having weaker types of shields. So, it would be to the player’s benefit to ignore the Wooden Shield, since they are the weakest, and simply go for the more powerful shields. However, we improved on the shield mechanics below:
If a shield type is overall weaker in power (e.g. Wood Shield), it is also lighter to carry. However, if a shield type is overall more powerful (e.g. White Shield), the slower the player will move as they are holding the shield.
We were originally mimicking Breath of the Wild‘s “weapon hitting shield mechanic” pretty closely, in that an agile weapon could still hit a shield a few times to eventually knock an opponent down. We ended up redefining this to be:
If the attack power of a shield is greater than the weapon attacking it, the holder of the weapon attacking will automatically stun.
Heavy weapons hitting a shield still apply though, where the holder of a shield will be stunned.
But, if the shield happens to be greater attack power than the heavy weapon’s damage, then both parties will be stunned.
Parrying or reflecting no longer damages the shield to rank down.
Leveling up your shield is important now, because weaker weapons attacking it will be vulnerable to your strengthen shield. It also makes agile weapons a terrible choice for fighting against enemies with a shield due to its lighter damage output (because of its faster attack repetition).
Power Shield
Updated Zoning
This part is a little more technical. So if that is not your thing, skip to the next section 😛. Game Maker Studio 2 (GMS2) gives the developer the ability to activate / deactivate objects. Objects that are deactivated are still in memory and can be turned on easily, but will not be processed each frame of the game. This is how we are able to make the open world part work is by only activating objects we need and unloading them when we don’t.
However, GMS2 unfortunately gives us no control over when an object is being activated or being deactivated. This is important because let’s say we have a fire arrow we shot and it’s burning. Normally a fire arrow will burn up in 10 seconds. Let’s say we “unload” the fire arrow by going somewhere and then a minute later we come back to the area where the fire arrow is at. Currently, the fire arrow will still be burning. If GMS2 had an event to say “hey, this fire arrow just came back into play, let’s do something about that”, we could say if the fire arrow has been around for more than 10 seconds, we automatically destroy it after reactivating it, since it would have burnt up by then.
I submitted a feature request to the Game Maker that simply was replied back with “we have plans on adding this, but have no time frame on when that will be complete”. With this reply, we decided to roll out our own event system. It’s pretty simple, really. Basically, we have a wrapper function that before it calls GMS2 activation / deactivation routines, we run our event that should “do something” when an instance activates / deactivates. We’re currently using the path_ended event, since we aren’t using GMS2 built in path variables, and therefore, it’s a free and open event to use. So, if an object gets activated or deactivated, it will run the event with a string saying what kind of activation it is. We have these constants:
fullyActivated – an instance is fully activated and collisions will work activated – when an instance is about to be activated. activatedFromPlacholder – when an instance is about to be activated because we are coming from a dialog state activatedFromPause – when an instance is about to be activated because we are coming from a pause state deactivated – when an instance is about to be deactivated deactivatedFromPlacholder – when an instance is about to be deactivated because we are going to a dialog state deactivatedFromPause – when an instance is about to be deactivated because we are going to a pause state
Even though this took quite a bit of reworking, it’s now faster than before, as well as giving us more control and flexibility down the road when we add a more robust layering system (think floors in dungeons).
Waterfall
Waterfall
We’ve been needing to add a waterfall for a while now. With the updated zone loading, this had some interesting side effects. The way the game loads in areas is by what we call zones. The game will load the area the player is in, plus a few surrounding zones outside the camera to make things not “pop in”. The original rule was all objects could be no bigger than a zone width and height. This was followed until now, wanting to make a waterfall, since the height of them are larger than one zone height. So, we had to rework how the loader was working to account for larger than zone objects.
The other problem we encountered was an object has two “boxes”: a hitbox and essentially what you see box (the image). For example, the hero has a 32×32 sprite, or rather, the box the image lives in. However, we don’t want collisions to be the entire image which is what the “hitbox” represents. The problem was a function we were using to see what things to “unload” was using hitboxes instead of the actual image. For loading / unloading, we actually want to use the image box, not the collision box. We can see with our debug camera enabled how even though there are four zones loaded, there are a few objects that are on the borders of those zones that are actually loaded as well. That way we don’t get a weird “pop in/out” effect as things get loaded / unloaded.
Object in Zones Debug Camera
Other Notable Features and Fixes in the Past Month
Enemies using weapons will not degrade anymore. Originally it was intentional that enemies weapons degraded. However, with the new merging system, it seemed weird to pickup a dropped weapon of an enemy only for it to degrade after using it few times.
Lost weapons get picked up by the store. If the player drops a weapon or kills an enemy and doesn’t pick up their weapon, eventually these weapons get “picked up” by the shop keeper. Another reason why it was so important to be able to run our activation events is when these weapons get unloaded, that’s when we decide if it should go back to a shop or not. When returned to the shop, weapons that can be merged will be automatically merged and are able to be bartered. This is an interesting mechanic because weapon merging shops also become bartering shops with potentially better weapons for the player.
Weapons Back to Store
Attacking with Elemental Rods. Fire, Water and Ice Rods originally had no collision on them and the only way to attack with rods was with the projectile they shot. We added collision on these rods. However, elemental rods are not meant to be used as melee weapons. As a consequence, if the player attacks with rod, it will drop in rank immediately.
Updated enemy chasing logic. Originally as soon as enemy was hit, all enemies nearby would “magically” be triggered to the chasing state as well. Now, enemies will look in the direction of the enemy in danger and determine what to do next. Also, if an enemy is chasing, and another enemy notices their friend chasing, they’ll look in their direction to see if they should chase too.
There were two new big features developed in this past month. The first, we are tentatively calling Draw Container (which was an overhaul to the text box system described in the post Day 32), is more technical in nature. Thus, I am going to do a separate post very soon about the feature because we want to open source this code for others in the Game Maker community to use.
The second, less technical feature built this month was adding a more interactive map that the player can use:
Better Map
Though this map has been in the game for some time, there was no interacting with it. We’ve now added a couple features to make the map more usable:
The player can now fast travel. The feature will probably mature over time. But at this point, blue dots on the map are points we can travel to. There’s no animation currently, as the way we’ve built the engine, no loading time is required. However, instantly moving feels a little jarring and will probably add something to make it feel right. If the player fast travels, they leave behind a point in which they can fast travel back to. This is great, for example, taking advantage of bringing found weapons back to the shop to get weapons upgraded, and then, returning back to where we were just at.
Green dots show locations of interest. One thing we noticed when people first started playing was trying to figure out where things were at. Granted, having signs on the trails, or signs on the houses would help (which we are planning on adding). But we thought it would be helpful to add these points on the map.
Yellow dots show points of interest and Red dots are the main objective. In the tutorial, one of the characters tells the hero that yellow dots on the map should be visited, while the red dots are the objective. Eventually we can get all fancy with how we color and display these dots — but the ability to have objective markers show up / disappear on maps exist even better now.
The player can zoom / pan the map. We’ve all used Google Maps, we expect some sort of panning and zooming these days. Thus, the ability to zoom and pan the map exists. If the map is all the way zoomed out, the cursor will simply move without being in the center of the screen. Otherwise, if we are zoomed in enough, we’ll keep the cursor in the center until we are approaching the edge of the map. There’s a little bit of polishing still to be done on this, but overall, it works pretty good.
Other Notable Features and Fixes in the Past Month
In this past month, I’ve had a few co-workers and friends play the game either for the first time ever, or the first time since April of last year. It was exciting to see them play and to gather their feedback. Though we were planning on doing a map eventually, we decided to act on the feedback and add some kind of workable map now. Anyway, here are the those items:
Dpad UI Update. It was unclear which item was equipped at the top of the screen. We were programmatically highlighting the color of the weapon. However, gray and yellow don’t mix well, which many “metal weapons” are colored in gray. An awesome suggestion from one of my co-workers was to simply highlight the Dpad direction that was equipped. Simple enough, easy to understand. This might change as graphics and UI get updated, but for now, simple enough solution to a bad UX.
Dpad UI
Interacting with Objects — Specifically Doors. Out of the same playthrough came another annoying issue. Many objects, especially doors, expect the player to be facing the object (mainly how the hitboxes are working behind the scenes). The problem that was occurring was players would get close to the door, but when a collision happens, to make the hero “slide” against walls, a new vector gets determine, which causes the player to face a different direction. Therefore, running into a door on a slight angle would force the hero to face a different direction, making it annoying to open a door because they were no longer facing it. This has now been polished and fixed.
Better Algorithm for Enemy’s Weapon Rank. Last month we talked about how we were randomizing enemy’s weapon and their rank. One issue I was noticing was if we didn’t have a certain weapon, and we ran into an enemy that was supposed to be “strong”, the weapon would still rank to the worst ranking. We ended up updating the algorithm to account for weapons the player doesn’t have, or has low ranking of, relative to what an enemy should be ranked at.
Moved the Initial Chest House, Shop and Dojo. One of the NPCs currently say in the demo “A weapon? Tell you what. I have a few chests in my shop right over there. You’re welcome to take what is in them.” Currently on the screen at the time is a house. So naturally players went into that house — only to find out that it was the Dojo. We ended up moving around these houses / shops so that it felt a little more natural based on how players were initially moving.
House Arrangement
Knocking Enemies Off of Cliffs if they’re Stunned. This has been something I’ve wanted to add for a while. Now, if the player or an enemy get stunned, and their force is in the direction of a cliff, they will fall down the cliff and take damage.
Falling Off Cliff
Added a Temperature Gauge. For a while, we’ve had the weather in the bottom right corner of the HUD. However, we can easily tell what the weather is based on visuals — like seeing rain or clouds. We decided to add a gauge that shows whether the player is getting hot or cold.
This past month or so has seen quite a few additions to the game. The most notable feature was letting the player choose which items they want to barter. A lot of refactoring had to happen to make being able to choose what to barter work. Before, only five distinct pause states were allowed — menuing, item, dialog, map and death. The reason these were distinct was because the player could only be in one at a time, without overlap. For example, when we pressed start to pause the game to go into menuing, we did so from the game state. If we wanted to get back to the game, we’d unpause and be back into the game state. If we were talking, it was because we did so from the game state.
A dilemma started to arise though as we began working on bartering. So far, there was no need to account for dialog state to menuing state, then back to dialog state. But now, if the player decided they wanted to choose what to barter, we were not coming from the game state, but rather, from a dialog state. Because of this new complexity, we needed to rewrite the way pausing was working so that it was using stacks instead of a simple boolean toggle.
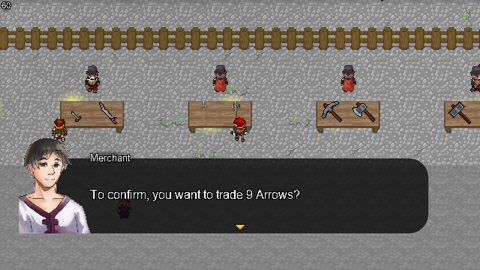
Bartering Confirm
With this out of the way, we also need a way to input “how many” of a thing we wanted to barter. For example, if we have 15 arrows, perhaps we only want to barter 5 of them. We needed to give the player a way to input this number. Therefore, we added a simple numeric up/down menu item. To make it easier for the player, instead of pressing left or right for each decrease/increase of the input, we can simply hold down the direction. Holding down the direction yields bigger increments / decrements for the input.
Numeric Up/Down
Practically Speaking
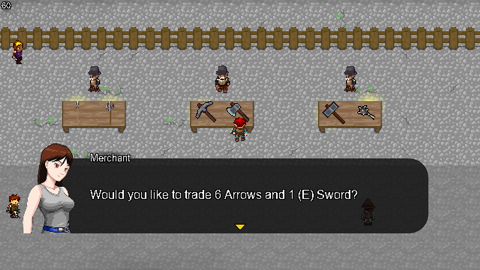
Enough CS talk. What does mean for the game? So far my initial thoughts are that it’s a bit tedious to get the item / weapon we want. One thing that we didn’t mention yet is though the NPC still chooses randomly what to barter, they remember what they’ve already chosen, so the automatic part seems to be working well and is less tedious. However, as soon as the player wants to choose, currently, we throw away that data. To make this less tedious and more fun / playable, if the NPC does not like what the player chose, instead of randomly picking again, the NPC should center its “counter offer” around what the player chose, as well as factoring in what has been denied up to that point. I think there’s still potential here, but it needs to “just work” in order for it to “feel right”.
Bartering Counter
Other Notable Features and Fixes in the Past Month
Most of the features / fixes centered around bartering. However, with the holiday season, we were able to demo the game to a few friends and family members who haven’t seen the game in almost a year! Therefore, we were able to take some really good notes — many centering around very simple stuff, like, how to play the game! Therefore, we’ve begun to double down on adding more “tutorialy” things. Here’s the list:
Since a lot of the NPCs are placeholder and otherwise, doing nothing, we decided to give them some dialog. Currently, that dialog is simple “how to play” things, as well as simple to in-depth mechanics of the game.
There’s now a Dojo that teaches the player simple fighting mechanics. This is not required for the player, but should be useful for those playing it for the first time.
Dojo
Whenever a player picks up an item or weapon for the first time, a quick message appears explaining how to use the weapon and showing which button to press.
Use Weapon Tutorial
Many people who have played The Legend of Zelda: A Link to the Past know that Link can jump off cliffs. The same can be done in Violet. However, many people who have played the game don’t realize they can do so. Therefore, when the player gets near a ledge, a simple, non-interrupting pop up appears.
Jump Tutorial
We added WIP doors! There is no animation for the hero currently, so he just uses the jumping animation. It’s kind of goofy!
Though placedholder, and repetitive (meaning we don’t have unique portraits for ALL NPCs), we’ve added some more NPC portraits in the game. I found while testing bartering for the fifteenth hundred time that we should get a few more portraits in the game. I simply imported portrait graphics from PlayCraft and ZeNeRIA29.
NPC Portrait
We’ve added a few more balanced weapons: Rapier, Saber and Dagger. The Rapier has a little more durability than other balanced weapons. The Saber has less durability, but is a tad stronger. The Dagger‘s range is extremely small. However, a sneak kill in the game for any weapon yields 10x the damage output for a weapon, where a dagger has a 20x multiplier.
We’ve added a few more bows: Recurve Bow and Great Bow. With all bows before, if something was moving, and a bow and arrow (or any projectile, really) was shot, it may miss the target, because the direction was computed based on where the target was at, not where it was going. Therefore, we are now accounting for that, sort of. What we mean by that is for a Recurve Bow, it is 90% accurate when shooting at a moving target. We take the “where it’s going part” and use a .9 multiplayer. If an enemy is moving really fast, the player may still miss it. The Standard Bow has a .4 multiplier on it. These multipliers hopefully gives “uniqueness” to each bow. If the player is moving while shooting, the multiplier is even less! It’s best to shoot at a moving target when the hero is standing still. Oh! And the Great Bow can shoot three arrows at once!
Recurve Bow
Lastly, all the Soldier enemies now carry weapons randomly, based on their type. For example, an OrcBalanced would randomly choose between a Sword, Rapier, Saber and a Dagger. Not only are there weapons randomized, but now their ranking is relative to the player’s ranking. For example, if a player is carrying a D rank sword, the OrcBalanced can rank up to D as well. There is a cap for easier enemies, and less of a cap for harder enemies. That way, player is not farming high ranked weapons off of easy Soldier enemies.
An idea I have had early on is bartering in a game. Most games, and even real life, have some kind of currency where one can buy goods and services. Money is really just a form of agreed upon currency that society has determined. But in reality, the value of money is just made up. When someone spends money, one is buying into the value of the good or service, relative to their own wants or needs. For example, a $300 Nintendo Switch, which I think is “awesome”, is “worthless” to my Grandma; there is no value of a Switch for her. So if we really think about it, we’re all just bartering goods and services with a standard exchange rate. Therefore, early on in the game’s development, I thought “what if there was no established currency? What kind of ‘new’ game mechanics could come out of it?”
In Violet, maybe a player perceives the agile weapons as superior, while another player likes the mechanics of the element rods better. Instead of the game (e.g. the developer, me) determining what an item or object is worth, we’ll let the player decide.
Bartering
In all economic systems, all goods and services have some kind of “value”, or mathematically, a number associated with it. The game will still attach a “perceived value” to each item in the game as a starting point. But with a bartering system, those you are trading with in the game can fluctuate that value. Maybe firewood is “more valuable” in the cold mountains, where as “ice cream” is more valuable in the tropical region. Or perhaps a NPC really likes apples, while another really likes balanced weapons.
We believe this could be an interesting mechanic for two reasons:
For those like me, who do not normally talk to NPCs in games, now have a reason to interact with them. The more you get to know someone, the more you get to know their likes and dislikes. If a particular NPC has a sword, and you know they love apples, the player can be advantageous and trade their unnecessary apples for a new sword.
The “collectathon” element of the game becomes more valuable, because anything could become currency. The player may stumble upon some junk that may end up being someone else’s treasure.
One drawback is it could be tedious for the player to get goods and services in Violet. One way we’ve remedied that is by having the NPC automatically go through your inventory and choose what to trade. Right now it’s at random, but could easily be improved upon by adding some intelligence, such as not rechoosing something the player already rejected, or being biased based on the NPC’s preferences.
The other drawback is that there isn’t that one established collecting item (currency) that players will drive towards. For example, there isn’t a concept of rewarding the player with “money” because, there is no money. Getting the “collectathon” element of the game right becomes extremely important.
Right now, bartering is just in a proof-of-concept. But so far, we really like the direction of where this mechanic is going. We are excited to see how this feature gets better over time.
Other Notable Features and Fixes in the Past Month
This past month was more of a refactoring and cleaning up TODOs month. I hadn’t really gone through and cleaned up anything since the beginning of the year, and there were definitely a big list of things needing cleaned up. However, there was a few new notable features as well. Here’s the list:
Abstracted “Menuing” for NPCs, Pause Menu, etc.
If we are going to be able to barter, we need to be able to menu. We abstracted the menuing system from the pause menu and made it is own thing that can be used anywhere. This means NPCs are now able to respond to input from the player.
Added “Eat to Full Health”.
Instead of rapid fire eating a one heart healing item, we’ve add the ability to “eat to full health”, which allows the user to menu once and eat as many of an item that is needed to be at “full health.”
Began adding a new area — the intersection between forest and grasslands.
Added $ to hold text injection for dynamic text for NPCs.
For example, the translation file has “Would you like to trade $?” and we can inject dynamic text into the $ placeholder (read “Would you like to trade 10 arrows?”).
If a soldier enemy continues to get stunned, they will immediately attack hero.
This prevents the player from taking complete advantage of a stunned soldier type enemy. We may abstract this out to only certain soldier type enemies in the future.
Infinite clouds during paused fixed
When you pause a game, you’re not really pausing the game, but rather “deactivating” things. Apparently, I did not deactivate the controller that generates clouds when paused. But, we were deactivating the controller that despawns clouds. Thus, keeping the pause screen on for too long caused resuming the game to be pretty foggy.
Fire spreads correctly again.
Temperature with fire was incorrect when there was fire loaded.
Even if the player wasn’t near fire, the player was “warmed up” as if they were.
Many TODOs completed / patched as well as other optimizations.
As mentioned, this was a big month of refactoring and clean up. Hopefully we’ll have better foundation to continue building new features upon.